maven-archetype-webapp 인 Maven 프로젝트 생성.
스프링에 필요한 각종 라이브러리 및 설정들을 세팅한 후 진행한다.
Sping을 위한 세팅
DispatcherServlet을 FrontController로 설정하기
- DispatcherServlet을 FrontController로 설정하는 방법은 3가지가 있다.
· web.xml 파일에 설정
· javax.servlet.ServletContainerInitializer 사용
- 서블릿 3.0 스펙 이상에서 web.xml파일을 대신해서 사용할 수 있다.
· org.springframework.web.WebApplicationInitializer 인터페이스 구현
*web.xml파일에서 DispatcherServlet 설정하기
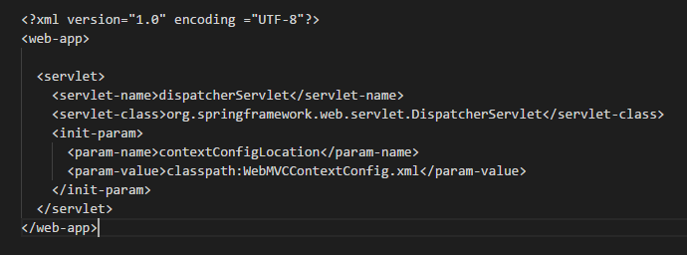
- <servlet-name>은 servlet mapping이 갖고 있는 servelet-name하고 같으면 된다.
- <sevlet-class>가 실제로 내가 동작시킬 클래스를 의미한다. Spring이 제공하는 DispatcherServlet을 사용할 것이기 때문에 패키지 명을 포함새서 Spring이 제공하고 있는 클래스 명을 명확히 작성해야함
- <init-param>에서는 DispatcherServlet 같은 경우 Spring이 제공하고 있기 때문에 실제로 내가 무슨 일을 하고 싶은지에 대한 내용까지는 알 수 없다. 이런 부분에 대한 설정을 하고 있는 것이 현재 init-param이 지정하고 있는 부분이다.
*java config spring 설정 읽어들이도록 DispatcherServlet 설정
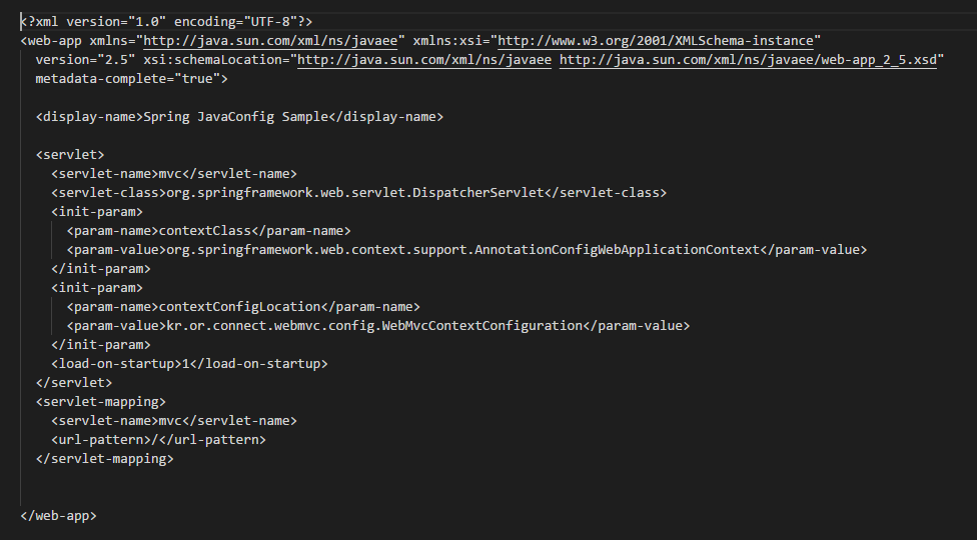
- init-param 부분에 xml 파일이 아니라 자바 클래스 이름을 넣고 있는 것을 볼 수 있다.
- 즉, xml 파일이 아닌 자바 config 파일을 읽어 온다.
- <url-pattern> 여기에다 우리가 원하는 URL 주소를 넣고 이 부분의 <servlet-name>과 같은 name으로 맵핑 되어있는 서블릿 클래스를 실행한다.
- <url-pattern> 사이에 '/' 는 모든 요청을 다 받게 된다.
WebApplicationInitializer를 구현해서 설정하기
- Spring MVC는 ServletContainerInitializer를 구현하고 있는 SpringServletContainerInitializer를 제공한다.
- SpringServletContainerInitializer는 WebApplicationInitializer 구현체를 찾아 인스턴스를 만들고 해당 인스턴스의 onStartup 메소드를 호출하여 초기화한다.
- 단점 : 느림, 이 과정에서 사용하지 않는다.
Spring MVC 설정
- kr.or.connect.webmvc.config.WebMvcContextConfiguration
- DispatcherServlet에 대한 설정은 web.xml에서 하고, DispatcherServlet이 읽어 들여야 하는 설정은 자바 config로 한다.
- DispatcherServlet은 해당 설정 파일을 읽어들여서 내부적으로 Spring 컨테이너인 ApplcationContext를 생성하게 된다.
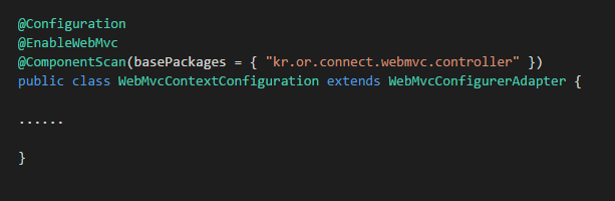
@Configuration
- 설정파일이란걸 알려주는 어노테이션
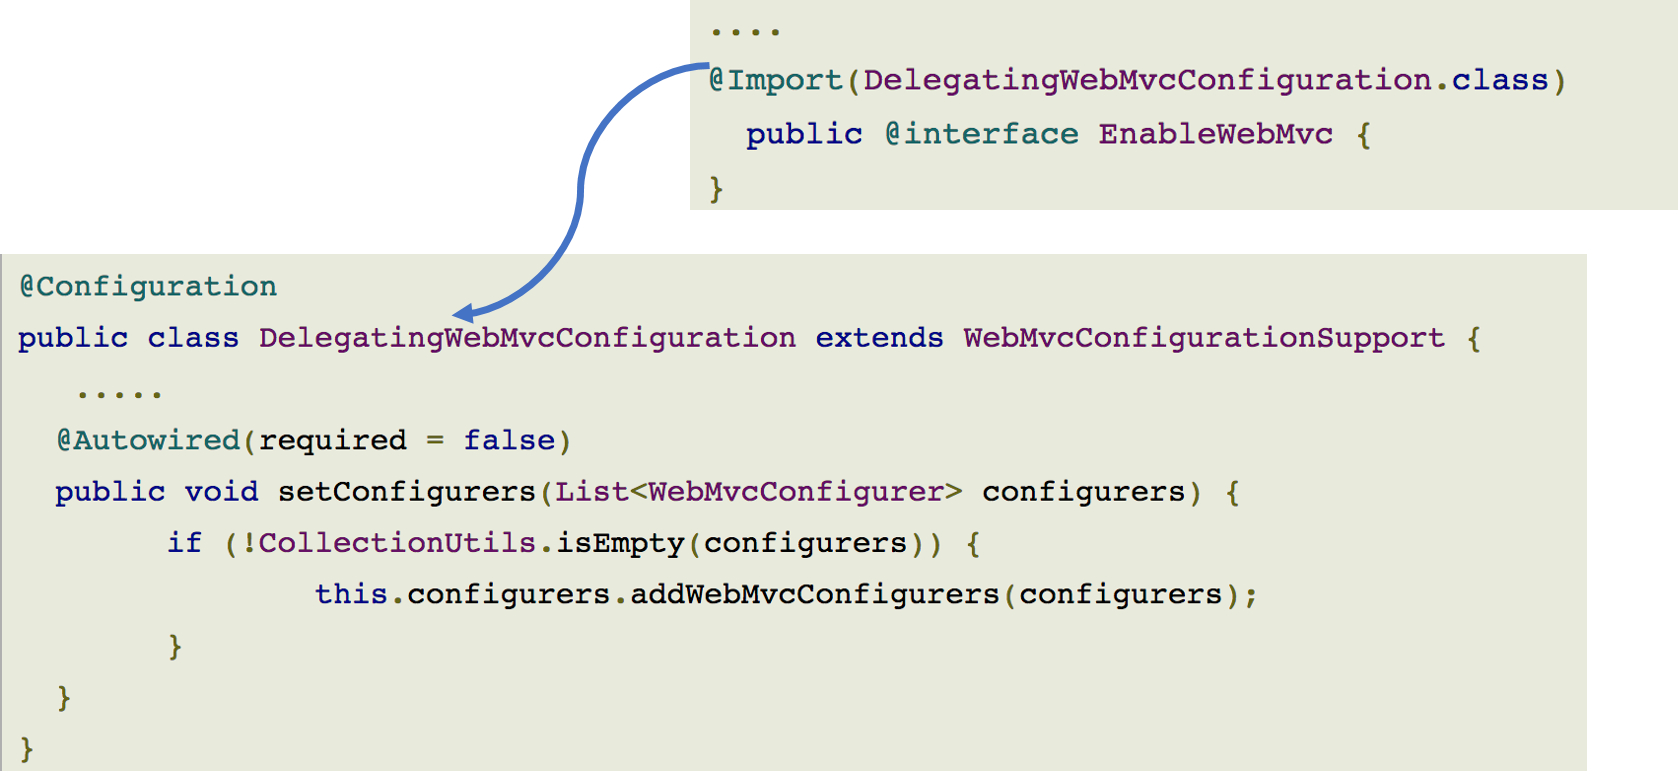
@EnableWebMvc
- DispatcherServlet의 RequestMappingHandlerMapping, RequestMappingHandlerAdapter, ExceptionHandlerExceptionResolver, MessageConverter 등 Web에 필요한 빈들을 대부분 자동으로 설정해준다.
- xml로 설정의 <mvc:annotation-driven/> 와 동일하다. 우린 이건 이용안함.
- 기본 설정 이외의 설정이 필요하다면 WebMvcConfigurerAdapter 를 상속받도록 Java config class를 작성한 후, 필요한 메소드를 오버라이딩 하도록 한다.
좀 더 알고 싶은 경우 아래의 URL
@ComponentScan
- ComponentScan애노테이션을 이용하면 Controller, Service, Repository, Component애노테이션이 붙은 클래스를 찾아 스프링 컨테이너가 관리하게 된다.
- DefaultAnnotationHandlerMapping과 RequestMappingHandlerMapping구현체는 다른 핸들러 매핑보다 훨씬 더 정교한 작업을 수행한다. 이 두 개의 구현체는 애노테이션을 사용해 매핑 관계를 찾는 매우 강력한 기능을 가지고 있다. 이들 구현체는 스프링 컨테이너 즉 애플리케이션 컨텍스트에 있는 요청 처리 빈에서 RequestMapping애노테이션을 클래스나 메소드에서 찾아 HandlerMapping객체를 생성하게 된다.
- HandlerMapping은 서버로 들어온 요청을 어느 핸들러로 전달할지 결정하는 역할을 수행한다.
- DefaultAnnotationHandlerMapping은 DispatcherServlet이 기본으로 등록하는 기본 핸들러 맵핑 객체이고, RequestMappingHandlerMapping은 더 강력하고 유연하지만 사용하려면 명시적으로 설정해야 한다.
WebMvcConfigurerAdapter
- org.springframework.web.servlet.config.annotation. WebMvcConfigurerAdapter
- @EnableWebMvc 를 이용하면 기본적인 설정이 모두 자동으로 되지만, 기본 설정 이외의 설정이 필요할 경우 해당 클래스를 상속 받은 후, 메소드를 오버라이딩 하여 구현한다.
Controller 클래스 작성하기
- @Controller 어노테이션을 클래스 위에 붙인다.
- ComponentScan이 읽어들여서 Spring 컨테이너가 관리하게 만든다.
- 맵핑을 위해 @RequestMapping 어노테이션을 클래스나 메소드에서 사용한다.
@RequestMapping
- Servlet에서 URL 패턴 지정하는 부분이랑 같은 기능이다.
- Http 요청과 이를 다루기 위한 Controller의 메소드를 연결하는 어노테이션
- Http Method 와 연결하는 방법
@RequestMapping("/users", method=RequestMethod.POST)
Spring 4.3 version 에서 추가된 어노테이션
@GetMapping
@PostMapping
@PutMapping
@DeleteMapping
@PatchMapping
- Http 특정 해더와 연결하는 방법
@RequestMapping(method = RequestMehod.GET, headers = "content-type=application/json")
- Http Parameter와 연결하는 방법
@RequestMapping(method=RequestMethod.GET, params = "type=raw")
- Content-Type Header 와 연결하는 방법
@RequestMapping(method=RequestMethod.GET, consumes="application/json")
- Accept Header 와 연결하는 방법
@RequestMapping(method = RequestMethod.GET, produces="application/json")
실습
*pom.xml
1
2
3
4
5
6
7
8
9
10
11
12
13
14
15
16
17
18
19
20
21
22
23
24
25
26
27
28
29
30
31
32
33
34
35
36
37
38
39
40
41
42
43
44
45
46
47
48
49
50
51
52
53
54
55
56
57
58
59
60
61
62
63
64
65
66
67
68
69
70
71
72
73
74
75
76
77
78
79
80
81
82
83
84
85
86
87
88
89
90 |
<project xmlns="http://maven.apache.org/POM/4.0.0"
xmlns:xsi="http://www.w3.org/2001/XMLSchema-instance"
xsi:schemaLocation="http://maven.apache.org/POM/4.0.0 http://maven.apache.org/maven-v4_0_0.xsd">
<modelVersion>4.0.0</modelVersion>
<groupId>kr.or.connect</groupId>
<artifactId>mvcexam</artifactId>
<packaging>war</packaging>
<version>0.0.1-SNAPSHOT</version>
<name>mvcexam Maven Webapp</name>
<url>http://maven.apache.org</url>
<properties>
<project.build.sourceEncoding>UTF-8</project.build.sourceEncoding>
<spring.version>4.3.18.RELEASE</spring.version>
</properties>
<dependencies>
<dependency>
<groupId>junit</groupId>
<artifactId>junit</artifactId>
<version>3.8.1</version>
<scope>test</scope>
</dependency>
<dependency>
<groupId>javax.servlet</groupId>
<artifactId>javax.servlet-api</artifactId>
<version>3.1.0</version>
<scope>provided</scope>
</dependency>
<!-- https://mvnrepository.com/artifact/jstl/jstl -->
<dependency>
<groupId>jstl</groupId>
<artifactId>jstl</artifactId>
<version>1.2</version>
</dependency>
<!-- Spring -->
<dependency>
<groupId>org.springframework</groupId>
<artifactId>spring-context</artifactId>
<version>${spring.version}</version>
</dependency>
<dependency>
<groupId>org.springframework</groupId>
<artifactId>spring-jdbc</artifactId>
<version>${spring.version}</version>
</dependency>
<dependency>
<groupId>org.springframework</groupId>
<artifactId>spring-webmvc</artifactId>
<version>${spring.version}</version>
</dependency>
<dependency>
<groupId>org.springframework</groupId>
<artifactId>spring-tx</artifactId>
<version>${spring.version}</version>
</dependency>
<!-- basic data source -->
<dependency>
<groupId>org.apache.commons</groupId>
<artifactId>commons-dbcp2</artifactId>
<version>2.1.1</version>
</dependency>
<dependency>
<groupId>junit</groupId>
<artifactId>junit</artifactId>
<version>3.8.1</version>
<scope>test</scope>
</dependency>
</dependencies>
<build>
<plugins>
<plugin>
<groupId>org.apache.maven.plugins</groupId>
<artifactId>maven-compiler-plugin</artifactId>
<version>3.6.1</version>
<configuration>
<source>1.8</source>
<target>1.8</target>
</configuration>
</plugin>
</plugins>
</build>
</project>
|
cs |
*WebMvcContextConfiguration.java
1
2
3
4
5
6
7
8
9
10
11
12
13
14
15
16
17
18
19
20
21
22
23
24
25
26
27
28
29
30
31
32
33
34
35
36
37
38
39
40
41
42
43
44
45
46
47
48
49
50
51 |
package kr.or.connect.mvcexam.config;
import org.springframework.context.annotation.Bean;
import org.springframework.context.annotation.ComponentScan;
import org.springframework.context.annotation.Configuration;
import org.springframework.web.servlet.config.annotation.DefaultServletHandlerConfigurer;
import org.springframework.web.servlet.config.annotation.EnableWebMvc;
import org.springframework.web.servlet.config.annotation.ResourceHandlerRegistry;
import org.springframework.web.servlet.config.annotation.ViewControllerRegistry;
import org.springframework.web.servlet.config.annotation.WebMvcConfigurerAdapter;
import org.springframework.web.servlet.view.InternalResourceViewResolver;
@Configuration
@EnableWebMvc // 기본적인 설정들 다 해주세요
@ComponentScan(basePackages = { "kr.or.connect.mvcexam.controller" }) // basePackage 지정해주는거 잊지 말기!
public class WebMvcContextConfiguration extends WebMvcConfigurerAdapter {
@Override
public void addResourceHandlers(ResourceHandlerRegistry registry) {//web.xml에 <url-mapping> 사이에 '/'로 모든 요청을 받아들이는데,
//그러면 css, img, js 파일들이 전부 요청이 들어온다. 이 요청들의 처리할 url 설정에대한 코드이다.
registry.addResourceHandler("/assets/**").addResourceLocations("classpath:/META-INF/resources/webjars/").setCachePeriod(31556926);
registry.addResourceHandler("/css/**").addResourceLocations("/css/").setCachePeriod(31556926);
registry.addResourceHandler("/img/**").addResourceLocations("/img/").setCachePeriod(31556926);
registry.addResourceHandler("/js/**").addResourceLocations("/js/").setCachePeriod(31556926);
}
// default servlet handler를 사용하게 합니다.
@Override
public void configureDefaultServletHandling(DefaultServletHandlerConfigurer configurer) {
configurer.enable();
}
//특정 url에 대한 처리를 컨트롤러 클래스를 작성하지 않고 매핑할 수 있도록 해줌
@Override
public void addViewControllers(final ViewControllerRegistry registry) {
System.out.println("addViewControllers가 호출됩니다. ");
registry.addViewController("/").setViewName("main"); //요청이 '/'로 들어오면 'main'이라는 뷰로 나옴
}
//view name (위에서 'main')은 ViewResolver라는 객체를 이용해서 찾는다.
//getInternalResourceViewResolver()에서 설정된 형태로 뷰를 사용하게 된다.
@Bean
public InternalResourceViewResolver getInternalResourceViewResolver() {
InternalResourceViewResolver resolver = new InternalResourceViewResolver();
///WEB-INF/views/main.jsp
resolver.setPrefix("/WEB-INF/views/");//main 앞쪽
resolver.setSuffix(".jsp"); //main 뒷 쪽
return resolver;
}
}
|
cs |
- 위 설정들을 읽어들여 DispatcherServlet이 동작을 한다.
- 이 DispatcherServlet이 동작을 하기 위해 FrontController로 설정해야 한다.
*web.xml
1
2
3
4
5
6
7
8
9
10
11
12
13
14
15
16
17
18
19
20
21
22
23
24
25
26
27 |
<?xml version="1.0" encoding="UTF-8"?> <!-- 이전에 있던 내용 지우고 이렇게 수정해야한다. servers view에서 해당 프로젝트 내용 삭제후 재실행 -->
<web-app>
<display-name>Spring JavaConfig Sample</display-name>
<servlet>
<servlet-name>mvc</servlet-name><!-- 3.요기 mvc 서블릿 있네 -->
<servlet-class>org.springframework.web.servlet.DispatcherServlet</servlet-class> <!-- FrontController로 설정-->
<!--AnnotationConfigWebApplicationContext를 사용 할거다!-->
<init-param>
<param-name>contextClass</param-name>
<param-value>org.springframework.web.context.support.AnnotationConfigWebApplicationContext</param-value>
</init-param>
<!--DispatcherServlet 실행 될때 읽어드릴 설정파일 : WebMvcContextConfiguration 등록, 패키지명까지 명시!-->
<init-param>
<param-name>contextConfigLocation</param-name>
<param-value>kr.or.connect.mvcexam.config.WebMvcContextConfiguration</param-value>
</init-param>
<load-on-startup>1</load-on-startup>
</servlet>
<servlet-mapping>
<servlet-name>mvc</servlet-name><!-- 2.mvc란 이름의 서블릿으로 보내라 -->
<url-pattern>/</url-pattern><!-- 1.모든 요청은 -->
</servlet-mapping>
</web-app>
|
cs |
*main.jsp
1
2
3
4
5
6
7
8
9
10
11
12 |
<%@ page language="java" contentType="text/html; charset=UTF-8"
pageEncoding="UTF-8"%>
<!DOCTYPE html PUBLIC "-//W3C//DTD HTML 4.01 Transitional//EN" "http://www.w3.org/TR/html4/loose.dtd">
<html>
<head>
<meta http-equiv="Content-Type" content="text/html; charset=UTF-8">
<title>Insert title here</title>
</head>
<body>
<h1>main page</h1>
</body>
</html>
|
cs |
- main.jsp는 WebMvcContextCofiguraion.java에서 설정한 대로 /WEB-INF/views/main.jsp 에다 집어넣는다.
======================================================================================
Controller작성 실습 1/3
- 웹 브라우저에서 http://localhost:8080/mvcexam/plusform 이라고 요청을 보 내면 서버는 웹 브라우저에게 2개의 값을 입력받을 수 있는 입력 창과 버튼이 있는 화면을 출력한다.
- 웹 브라우저에 2개의 값을 입력하고 버튼을 클릭하면 http://localhost:8080/mvcexam/plus URL로 2개의 입력값이 POST방식으로 서버에게 전달한다. 서버는 2개의 값을 더한 후, 그 결과 값을 JSP에게 request scope으로 전달하여 출력한다.
*plusFrom.jsp
1
2
3
4
5
6
7
8
9
10
11
12
13
14
15
16 |
<%@ page language="java" contentType="text/html; charset=EUC-KR"
pageEncoding="EUC-KR"%>
<!DOCTYPE html PUBLIC "-//W3C//DTD HTML 4.01 Transitional//EN" "http://www.w3.org/TR/html4/loose.dtd">
<html>
<head>
<meta http-equiv="Content-Type" content="text/html; charset=EUC-KR">
<title>Insert title here</title>
</head>
<body>
<form method="POST" action="plus">
value1 : <input type="text" name="value1"><br>
value2 : <input type="text" name="value2"><br>
<input type="submit" value="확인">
</form>
</body>
</html>
|
cs |
*plusResult.jsp
1
2
3
4
5
6
7
8
9
10
11
12 |
<%@ page language="java" contentType="text/html; charset=UTF-8"
pageEncoding="UTF-8"%>
<!DOCTYPE html PUBLIC "-//W3C//DTD HTML 4.01 Transitional//EN" "http://www.w3.org/TR/html4/loose.dtd">
<html>
<head>
<meta http-equiv="Content-Type" content="text/html; charset=UTF-8">
<title>Insert title here</title>
</head>
<body>
${value1} 더하기 ${value2} (은/는) ${result} 입니다.
</body>
</html>
|
cs |
*PlusController.java
1
2
3
4
5
6
7
8
9
10
11
12
13
14
15
16
17
18
19
20
21
22
23
24
25
26
27
28
29
30 |
package kr.or.connect.mvcexam.controller;
import org.springframework.stereotype.Controller;
import org.springframework.ui.ModelMap;
import org.springframework.web.bind.annotation.GetMapping;
import org.springframework.web.bind.annotation.PostMapping;
import org.springframework.web.bind.annotation.RequestParam;
@Controller
public class PlusController {
//plusform
//뷰만 찾아서 뷰에대한 정보를 넘긴
@GetMapping(path = "/plusform")
public String plusform() { //view name을 넘기기 때문에 String 타입으로
return "plusForm";
}
@PostMapping(path="/plus")
public String plus(@RequestParam(name="value1", required=true) int value1, @RequestParam(name="value2", required=true) int value2, ModelMap modelMap) {
//@RequestParam(name="value1", required=true) int value1 : input의 name이 "value1"인 것의 값을 int value1에 넣음
//httpServletRequest를 통해서 전달받을 수 있지만, Spring이 제공해주는 ModelMap을 이용하는 것이 더 좋다.
//ModelMap에 넣어주면 알아서 Spring이 requestScope에다 알아서 넣어준다.
int result = value1 + value2;
modelMap.addAttribute("value1",value1);
modelMap.addAttribute("value2",value2);
modelMap.addAttribute("result",result);
return "plusResult";//뷰 네임 반환 -> webMvcContextConfiguration의 ViewResolver로 plusResult.jsp를 찾아낸다.
}
}
|
cs |
Spring MVC가 지원하는 Controller메소드 인수 타입
- javax.servlet.ServletRequest
- javax.servlet.http.HttpServletRequest
- org.springframework.web.multipart.MultipartRequest
- org.springframework.web.multipart.MultipartHttpServletRequest
- javax.servlet.ServletResponse
- javax.servlet.http.HttpServletResponse
- javax.servlet.http.HttpSession
- org.springframework.web.context.request.WebRequest
- org.springframework.web.context.request.NativeWebRequest
- java.util.Locale
- java.io.InputStream
- java.io.Reader
- java.io.OutputStream
- java.io.Writer
- javax.security.Principal
- java.util.Map
- org.springframework.ui.Model
- org.springframework.ui.ModelMap
- org.springframework.web.multipart.MultipartFile
- javax.servlet.http.Part
- org.springframework.web.servlet.mvc.support.RedirectAttributes
- org.springframework.validation.Errors
- org.springframework.validation.BindingResult
- org.springframework.web.bind.support.SessionStatus
- org.springframework.web.util.UriComponentsBuilder
- org.springframework.http.HttpEntity<?>
- Command 또는 Form 객체
Spring MVC가 지원하는 메소드 인수 애노테이션
- @RequestParam
- @RequestHeader
- @RequestBody
- @RequestPart
- @ModelAttribute
- @PathVariable
- @CookieValue
@RequestParam
- Mapping된 메소드의 Argument에 붙일 수 있는 어노테이션이다.
- @RequestParam의 name에는 http parameter의 name과 매핑이 된다.
(input 상자의 name 속성)
- required 속성은 해당 파라미터를 필수로 가져올지 말지를 결정한다.
@PathVariable
- 실제 url Path에서 '?변수명=값' 이런식으로 값을 넘겨 올 때, path에서 넘겨온 값을 받기 위해서 사용되는 어노테이션이다.
- @RequestMapping의 path에서 변수명을 받기 위해서는 place holder가 필요하다.
- place holder의 이름과 PathVariable의 name값과 같으면, 매핑이 된다.
- required 속성의 default는 true 이다.
@RequestHeader
- 요청정보의 헤더저오를 읽어들일 때 사용한다.
- @RequestHeader(name="헤더명") String 변수명
Spring MVC가 지원하는 메소드 리턴 값
- org.springframework.web.servlet.ModelAndView
- org.springframework.ui.Model
- java.util.Map
- org.springframework.ui.ModelMap
- org.springframework.web.servlet.View
- java.lang.String
- java.lang.Void
- org.springframework.http.HttpEntity<?>
- org.springframework.http.ResponseEntity<?>
- 기타 리턴 타입
=====================================================================================
Controller작성 실습 2/3
- http://localhost:8080/mvcexam/userform 으로 요청을 보내면 이름, email, 나이를 물어보는 폼이 보여진다.
- 폼에서 값을 입력하고 확인을 누르면 post방식으로 http://localhost:8080/mvcexam/regist 에 정보를 전달하게 된다.
- regist에서는 입력받은 결과를 콘솔 화면에 출력한다.
*userform.jsp
1
2
3
4
5
6
7
8
9
10
11
12
13
14
15
16
17 |
<%@ page language="java" contentType="text/html; charset=EUC-KR"
pageEncoding="EUC-KR"%>
<!DOCTYPE html PUBLIC "-//W3C//DTD HTML 4.01 Transitional//EN" "http://www.w3.org/TR/html4/loose.dtd">
<html>
<head>
<meta http-equiv="Content-Type" content="text/html; charset=EUC-KR">
<title>Insert title here</title>
</head>
<body>
<form method="post" action="regist">
name : <input type="text" name="name"><br>
email : <input type="text" name="email"><br>
age : <input type="text" name="age"><br>
<input type="submit" value="확인">
</form>
</body>
</html>
|
cs |
*regist.jsp
1
2
3
4
5
6
7
8
9
10
11
12 |
<%@ page language="java" contentType="text/html; charset=EUC-KR"
pageEncoding="EUC-KR"%>
<!DOCTYPE html PUBLIC "-//W3C//DTD HTML 4.01 Transitional//EN" "http://www.w3.org/TR/html4/loose.dtd">
<html>
<head>
<meta http-equiv="Content-Type" content="text/html; charset=EUC-KR">
<title>Insert title here</title>
</head>
<body>
<h2>등록 ㅋ</h2>
</body>
</html>
|
cs |
*UserController.java
1
2
3
4
5
6
7
8
9
10
11
12
13
14
15
16
17
18
19
20
21
22
23
24
25
26
27
28
29 |
package kr.or.connect.mvcexam.controller;
import org.springframework.stereotype.Controller;
import org.springframework.web.bind.annotation.ModelAttribute;
import org.springframework.web.bind.annotation.RequestMapping;
import org.springframework.web.bind.annotation.RequestMethod;
import kr.or.connect.mvcexam.dto.User;
@Controller
public class UserContoroller {
@RequestMapping(path="/userform", method=RequestMethod.GET) //이전 예제에서는 @GetMapping을 씀, 원하는대로
public String userform() {
return "userform";
}
@RequestMapping(path="/regist", method=RequestMethod.POST)
public String regist(@ModelAttribute User user) {
//하나씩이 아닌 여러개를 한꺼번에 담아 다닐 수 있는 가방
//DTO가 존재한다면 @ModleAttribute DTO dto로 한꺼번에 담을 수 있다.
//DTO 객체를 생성해주고 이 객체에다 값들을 넣어주는 일까지 한다.
//PlusController.java 에서의 @RequestParam은 하나씩 받아오는 것이다.
System.out.println("사용자가 입력한 user 정보입니다. 해당 정보를 이용하는 코드가 와야합니다.");
System.out.println(user); //콘솔에다 출력
return "regist"; // 뷰 네임 반환
}
}
|
cs |
*User.java
1
2
3
4
5
6
7
8
9
10
11
12
13
14
15
16
17
18
19
20
21
22
23
24
25
26
27
28
29
30 |
package kr.or.connect.mvcexam.dto;
public class User {
private String name;
private String email;
private int age;
public String getName() {
return name;
}
public void setName(String name) {
this.name = name;
}
public String getEmail() {
return email;
}
public void setEmail(String email) {
this.email = email;
}
public int getAge() {
return age;
}
public void setAge(int age) {
this.age = age;
}
@Override
public String toString() {
return "User [name=" + name + ", email=" + email + ", age=" + age + "]";
}
}
|
cs |
Controller작성 실습 3/3
- http://localhost:8080/mvcexam/goods/{id} 으로 요청을 보낸다.
- 서버는 id를 콘솔에 출력하고, 사용자의 브라우저 정보를 콘솔에 출력한다.
- 서버는 HttpServletRequest를 이용해서 사용자가 요청한 PATH정보를 콘솔에 출력한다.
- http://localhost:8080/mvcexam/goods/{id} {id}를 pathVariable이라고 한다.
*goodsById.jsp
1
2
3
4
5
6
7
8
9
10
11
12
13
14 |
<%@ page language="java" contentType="text/html; charset=EUC-KR"
pageEncoding="EUC-KR"%>
<!DOCTYPE html PUBLIC "-//W3C//DTD HTML 4.01 Transitional//EN" "http://www.w3.org/TR/html4/loose.dtd">
<html>
<head>
<meta http-equiv="Content-Type" content="text/html; charset=EUC-KR">
<title>Insert title here</title>
</head>
<body>
id : ${id} <br>
user_agent : ${userAgent}<br>
path : ${path }<br>
</body>
</html>
|
cs |
*GoodsController.java
1
2
3
4
5
6
7
8
9
10
11
12
13
14
15
16
17
18
19
20
21
22
23
24
25
26
27
28
29
30
31 |
package kr.or.connect.mvcexam.controller;
import javax.servlet.http.HttpServletRequest;
import org.springframework.stereotype.Controller;
import org.springframework.ui.ModelMap;
import org.springframework.web.bind.annotation.GetMapping;
import org.springframework.web.bind.annotation.PathVariable;
import org.springframework.web.bind.annotation.RequestHeader;
@Controller
public class GoodsController {
@GetMapping("/goods/{id}")
public String getGoodsById(@PathVariable(name="id") int id,
@RequestHeader(value="User-Agent", defaultValue="myBrowser") String userAgent,
HttpServletRequest request,
ModelMap model
) {
String path = request.getServletPath();
System.out.println("id : " + id);
System.out.println("user_agent : " + userAgent);
System.out.println("path : " + path);
model.addAttribute("id", id);
model.addAttribute("userAgent", userAgent);
model.addAttribute("path", path);
return "goodsById";
}
}
|
cs |
참고 사이트 : http://www.edwith.org/
※
본 게시물은 개인적인 용도로 작성된 게시물입니다. 이후 포트폴리오로 사용될 정리 자료이니 불펌과 무단도용은 하지 말아주시고 개인 공부 목적으로만 이용해주시기 바랍니다.
※